ver 1.1 released. Changes and new features in the Changelog .
Also the shader is now in the official polycount wiki page.
This is an experiment I started two weeks ago, inspired by Xoliul shader but specialized for environment with static light baked into it (lightmap).
It was build using the ShaderFX node based pipeline.
I also made a sample scene for it that you can download with the shader itself and play around with. It is based on the Atheneu building in my town, Bucharest and made a post apocalyptic scene for it. With snow:)
You can download the scene (with the shader included) from HERE or just the shader from HERE.
There is no help right now for it, it will be coming soon but the scene and the names of the parameters should be enough to get you started.
Some viewport screenshots (from the beta version) :
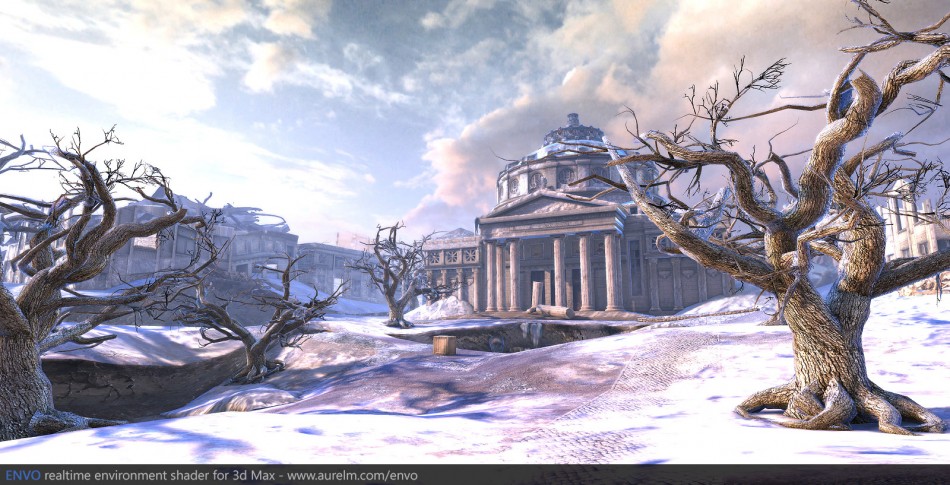

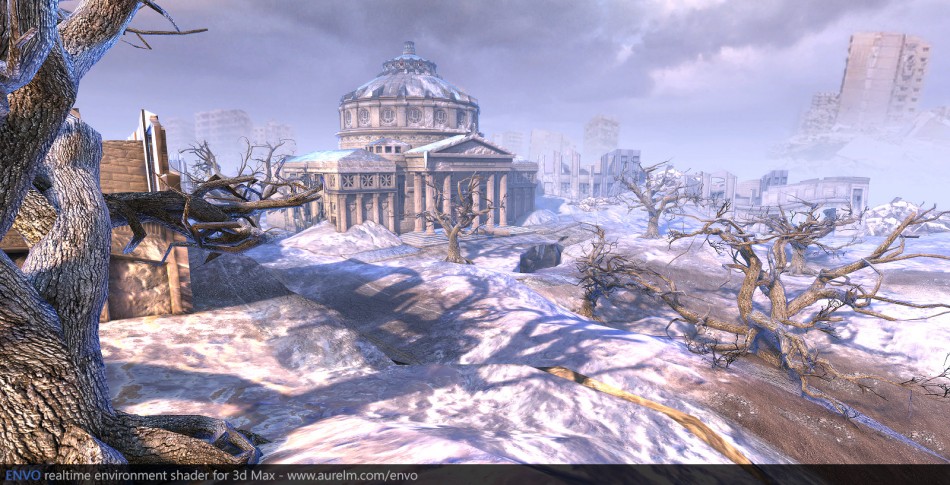
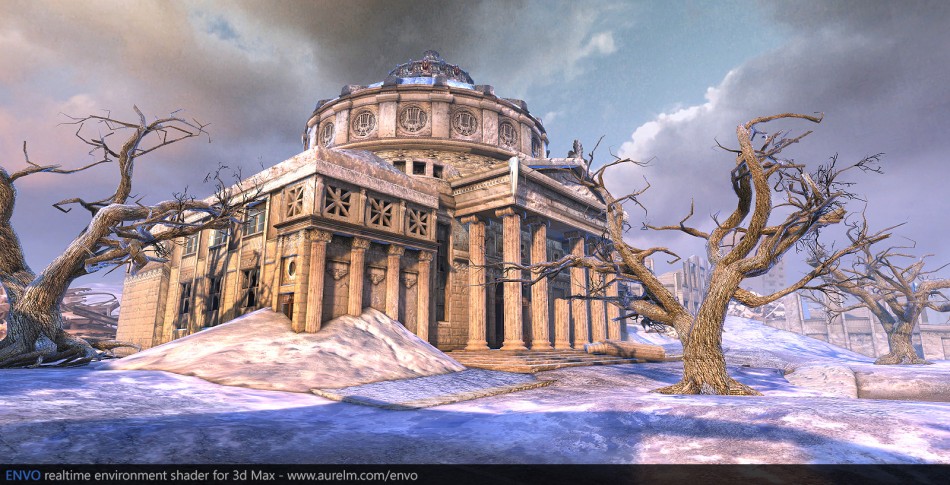
The shader at this moment supports:
-Diffuse texture
-Normal map
-Offset map (parallax
-Mask map (for specular, gloss, self illumination/glow)
-1 realtime light with diffuse, specular and attenuation
-Lightmap on uv channel 2
-Directional lightmaps
-Reflection map (cubemap blended or additive) using the specular map for intensity, fresnel factor for intensity, the lightmap as a mask for intensity.
-Reflection glossiness using mipmap lookup inside the cubemap texture.
-Fresnel light (additive or multiplied) with plenty of parameters
-Fog (height and depth)
-Texture blend using a mask texture and vertex color red channel. Uv’s for the mask and second set of textures are selectable
-Second set of textures (diffuse, normal, mask)
-Detail map with selectable uv tile that darkens and brightens using a middle gray as threshold.
-A lot of selectable parameters for all features.
-Using vertex color Red for blending, Green for reflection intensity and Blue for offset map power.
-3 techniques : Opaque, Alpha blend and Alpha test. The alpha techniques use the diffuse alpha channel as base alpha and are multiplied with vertex alpha as added effect.
Limitations:
-Only one realtime light for now
-Offset map can only be used with multi texturing if the mask texture and the second set of textures use UV channel 1.
-The shader, as any directx shader does NOT work with 3ds max Nitrous driver. Use DIRECT 3D.
Things to implement in the near future:
Complete set of other sharers useful for environment prototyping:
-Special water shader
-Special vegetation shader with vertex animation
-Special alpha shader for glass types, with depth and depth cracks
-Post processing shaders like bloom and color correction for final touches of the scene
Tools used for the shader and scene:
-Shader FX
-3d Studio max
-V-ray for lightmap
-Flatiron for lightmap uv channel generation
-Photoshop
-Crazybump for normal maps
-Speedtree for the trees.
-Nvidia texture tools for photoshop (to save as DDS textures. Using tga files so big is a performance killer).
Notes:
Use the scene and shader on anything non commercial (not that you could use it for anything else 🙂 ).
Help / F.A.Q.
How to use the ENVO shader.
Open 3dsmax. Make sure you use direct3d and not Nitrous as the video driver as directx shaders do not work in Nitrous.
Open material editor. Instead of standard select directx. Browse to the folder where you have copied the .fx file/files.
Now you have all the parameters there and you can start.
 The shader parameters:

Diffuse color – The diffuse color if no diffuse texture
Ambient color – If not using realtime light this is the ambient color
Normal map
Use normal map -If you want to use a normal map. Otherwise the defaul vertex normal is used.
Normal map – Normal map, of course :). Using UV map channel 1
Normal map power – How much the normal map modifies the base normal. Default is 1.
Detail texture
Use detail texture – The detail texture is a texture that is mapped on channel 1 and has a multiplied uv specified. It adds extra detail if the base textures don’t have enough. Usualy a noise texture where values greater that 0.5 gray increase brightness and bellow decreases it.
Detail texture – The detail texture
Detail texture power – How much the detail texture influences.
Detail texture UV multiplier -Uv multiplier of base channel 1 for detail texture
Mask texture (specular, gloss, self illumination)
Mask texture – The mask texture is a texture that uses each channel for different stuff. Uv channel 1
Red = specular/reflection
Green = Glossiness for light and reflection
Blue = Self illumination, glow
They are inactive unless you activate them from the next 3 checkboxex:
Mask texture red for reflection – If checked, the red channel of the texture will be used to modulate reflection from the cube map.
Mask texture green for reflection gloss -If checked, the green channel will be used for gloss. Further options for this in the “reflection” area of the shader
Mask texture blue for glow -If checked, the blue channel will represent what areas of the material will glow.
Glow
Glow color -The color for glow/self illumination.
Glow intensity from vertex color BLUE – How much the normal map modifies the base normal. Default is 1.
Parallax
Use parallax map – If checked you can use a grayscale depth texture that gives extra depth to the shader. Only works properly on channel 1 UV so you might want to keep all textures except lightmap on channel 1.
Parallax map -The parallax texture.
Parallax global map (UV2) -In case you want to use a global parallax for the whole scene and not based on diffuse textures.
Parallax power – How much the parallax map offsets the depth. Use low values (0.02 or so).
Parallax multiplied from vertex alpha – If checked you can use vertex alpha to modulate the power of the parallax map. You might want to use this to give lower parallax where the material blends with another one that does not use parallax,
Texture blend
You can have 2 sets of textures for the shader that blend based on vertex channel red.
Use texture blend -If checked the shader will do texture blend.
Texture blend mask texture – A much cooler texture blend can be obtained if using a blend mask so the transition between the textures is not smooth but rather based on that mask that can be for example a depth mask for the bricks on texture set 1 that will blend much more natural with the snow on texture set 2 and the snow will ocuppy first the space between the bricks.
Blend mask uses UV3– By default UV1 is used. You can use UV3 for the blend mask.
Texture blend contrast – When using a mask, the more contrast the steeper the transition between textures.
Second set of textures
That will blend with the first one
USE UV3 for second texture set – If checked, UV3 will be used for the second textures set
Diffuse 2, Normal Map 2, Mask tex 2– The second set of textures.
Lightmaps
Use lightmap – If checked, the shader will use a lightmap multiplied with 2 (for stronger light areas) mapped on channel 2. You should disable dynamic lights or use attenuation.
Lightmap – Lightmap texture.
Use directional lightmap – See resources on more about directional lightmaps and what they can do.
Lightmap 1, Lightmap 2, Lightmap 3– The 3 directional lightmap textures for the 3 needed light vectors for pixel.
Reflections
Use reflections -If checked, you can use a cube map for reflections.
Reflection map– The cubemap.
Reflection gloss multiplier -If you use mask texture green for gloss this will be used to have more contrast between gloss and non gloss areas.
Reflections global blur -The bigger the values, the more blurry the reflections. For your info the shader does a mipmap lookup tohave blurry reflections.
Reflections power – How powerful the reflections, a value between 0 and 1.
Use blended reflections – By default, the reflections are additive on top of the material. Using this they will be blended.
Reflections from vertex color green – If checked, you can paint with vertex color green to have areas with more or less reflections.
Reflections use fresnel – If you want, you can have reflections just on the edges of an object, based on the normal of the pixel to the camera.
Reflections fresnel power – Power of the reflections fresnel.
Reflections fresnel scale – More means more contrasted, concentrated on the edges.
Reflections fresnel bias – More means more towards the camera, less (negative value) moved outside.
Lightmap mask
You can use the lightmap as a mask for reflections, where darker areas don’t reflect as much or at all.
Reflection use lightmap mask – Enable/disable lightmap mask.
Lightmap mask brightness and Lightmap mask contrast– With these you can control where exactly you have or don’t have reflections relative to the lightmap.
Invert lightmap mask– Reverses the mask so darker areas will have more reflections.
Fresnel color
A nice extra touch is to have a glow/outline of color around objects. The color is additive
Use fresnel color -enable/disable fresnel color.
Fresnel power, fresnel scale and fresnel bias -Used exactly like the fresnel parameters for reflections.
Fog:
Use fog – If checked the shader will have fog.
Please note that for depth based calculations like fog you need to make sure that your objects have been x-from reset . Also when having a scene with multiple materials you should use Slate material editors to add common parameters for fog otherwise it will be very hard to tune the same parameters in so many materials.
Fog color and fog alpha control the color and maximum fog at the far side of the scene.
Fog near and fog far control where the fog starts and where it ends.
Realtime lights:
Note that at this point the shader only uses 1 light from the scene and you need to use the dropbox at the bottom of the shader to select it.
You can control the diffuse color, specular color, glossiness and attenuations from the parameters:
Dynamic light : The diffuse color of the light. Note that it adds on top of the lightmap like self illumination does.
Dynamic light specular color : The specular color
Light glossiness – The glossiness of the specular.
Light attenuation 1, 2 and 3 : 3 steps for attenuation, similar to the near and far attenuation in max.
Light attenuation scale : A global scale for the attenuation.
The alpha techniques:
The shader has 2 extra techniques for alpha materials. They use the diffuse texture/textures alpha channel + an added alpha using vertex color alpha.
Alpha test – Harsh alpha. Used for vegetation and anything sharp. Good because it does not have the problems with alpha sorting that aree very hard to get rid of.
Alpha blend – For smooth alpha like simulating fog, fire anything with smooth transitions. Please not that because the way max sorts alpha blended objects it’s very hard to get them working. If you cannot see an alpha object you need to duplicate it and delete the older version because max sorts alpha based on object creation order. If you have a tree in the background that is rendered on top of a tree in the foreground you need to duplicate the foreground one and delete the older version.
Using vertex color:
You can use all 4 components of vertex color with this shader
When you need to paint with one component and not affect the others (like paint specular without affecting texture blend) you can use the blending modes in vertex paint. FOr example when you want to paint with green for specular you can use “color dodge”. If you want to remove the red so you don’t have any specular but still keep the other components you can use “substract” when painting with red.
-Vertex color red : Used for texture blend. Where red = texture 2 and no-red = just texture one.
-Vertex color green : Used for reflection. Green = no reflection, no-green = maximum reflection
-Vertex color blue : Used for offset map. Maximum blue = maximum offset power.
-Vertex color alpha : Used for alpha. For example you want to make a lake and smoothly fade it to alpha = 0 near the shore. This goes on top of the existing alphas in the diffuse texture/textures/
CHANGELOG
8.06.2012 –1.1 version release.
-Simplified general interface while still making it longer 🙂
-Added directional light maps
-Option to disable/enable realtime light
-Option to disable/enable light attenuation
-Modified fresnel factor so it is processed with the rest of the light calculation and not above (this way if you have a black area the fresnel will not be a constant blue but keep the texture bellow ).
-Option to disable/enable diffuse texture (you can have a constant color)
-Option to disable lightmaps (you can use realtime light + and extra ambient color until you have lightmaps
-Option to disable/enable mask maps for each channel in case you don’t want them.
-Option to use or not use vertex color alpha, green, blue for Parallax, reflection and self illumination
-Option to disable/enable normal map and have just the vertex normal
-Option to modify normal map power by modulating it with the base vertex normal.
-Option to enable/disable reflections
-Disabled support for additive and blended reflections at the same time. It was useless. Now you have one set of reflections parameters and you can just switch between additive and blended.
-Option to disable/enable fresnel color
-Option to disable/enable fog.
Hopefuly the increased number of IFF’s in the shader will have a lesser impact on perfoarmance than all options enabled like in previous version.
Btw, here is a very good example on how much directional lightmaps increase quality.
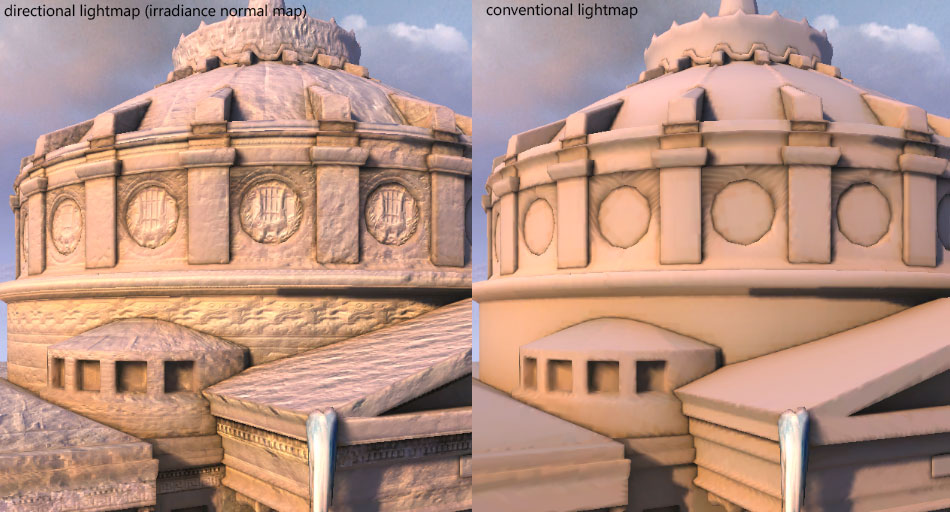
6.06.2012 – New beta version. This one features directional lightmaps (thank you Eric and Xoliul for the hints and of course Noors for this great tutorial on baking them using V-ray)
Also the shader has been added in the official Polycount Wiki page.
Here is a screenshot from the new version. As you can see the directional lightmaps do a lot.

And if you open the scene and check out Max scene effects loader you will see there is a loaded file called envo_bloom. It is a modified version of the one that comes with max that does a much simpler type of bloom based on luminance and 3 parameters. Also compared with the one in 3dsmax also works if you have alpha objects in the scene as it does not use any alpha channels.
Note that beta versions of the shader have the interface non-organized because I could not find out how to give interface priority on the nodes and I don’t have the time to manualy rearange the parameters in the .fx file by hand everytime.
———————————–
4.06.2012 – First version released
RESOURCES
Polycount wiki page for shader.
How to bake directional lightmaps with v-ray in 3d max as discovered by Noors.
ShaderFX, a node based shader editor for 3d studio max.
Full scene texture baking with Flatiron.
V-ray, the best tool for lightmap generation in 3ds max.

